Setting Up Tags and Post Previews In A Ghost Theme
After thinking through the appeal of boring technology yesterday, I've decided to stick with Ghost for my blog for the time being and actually, you know, put in the time to learn its theming system rather than start from scratch with something new. Ghost meets a lot of my criteria for my personal site: open source, self-hosted, and a pretty decent existing ecosystem. I'm not sure if it's quite at the level of boring that something like Django or Postgres is - things tend to break pretty badly whenever I update it, still - but it's been around for a while and is definitely better-supported than something I'd write myself. There's appeal in using something like eleventy and having all my website content live in markdown, but I like not having to think about managing a custom CMS and being able to use a full-featured WYSIWYG editor.
So, I'm diving back into Ghost theming for the first time in about two years. I've been using a lightly customized version of Ghost's Dawn theme for quite a while, and it works for the generally simplistic vibe I'm going for on this site, but I'd like to be able to allow for the front-end users to see posts by tag and see post previews, especially for things like a til or a link with a short comment that doesn't necessarily require you to click on a post page to get all of its content, much like Simon Willison's blog.
Setup
To get started follow the Ghost local installation instructions, put your theme of choice in a top-level /content folder.
You'll also want to cd content/themes/{your_theme} and run npm install, npm install -g gulp, then gulp - Ghost's default hot reloading doesn't include changes to CSS, but the included gulpfile should handle it.
That would probably work, but the official documentation for Dawn encourages you to follow these steps. Whatever.
# Install
yarn

# Run build & watch for changes
yarn dev
If you, like me, are on a Windows machine and prefer to develop in WSL, I'll note that Gulp's hot reloader has issues with running on WSL if the files aren't mounted in your WSL drive, so it may be easier to just run the yarn dev server in PowerShell. I regret all the choices that brought me to this point.
After that you should be good to go, but if you're having issues you can run:
ghost stop
ghost run -D
to run ghost with live logging.
Tags
For tags, I just added them to dawn's partials/content.hbs file, after the post content:
    <div class="single-content gh-content gh-canvas">
        {{content}}
               <div class="tag tag-list">
            {{#foreach tags}}
                <a class="tag tag-list-item " href="{{url}}">
                    {{name}}
                </a>
            {{/foreach}}
          </div>
    </div>
Ghost makes this so easy! There are even pre-existing utility classes for tags if you want to add them to the theme. If I hadn't been too lazy to re-set up a local dev environment for a while, I could have solved this ages ago.
Post previews
This is a bit trickier, and it might have been smarter for me to adapt another theme that already uses partial posts in its main view, but I relish a challenge, and generally I'd rather slowly add features to the extremely simple theme I'm using than take a complex one and have to cut out a bunch of stuff. The goal here is to:
1) Add text previews to all posts shown in the main feed.
2) For posts with note or link tags, show the entire post content in the feed, with the idea that these will be 2-3 sentence thoughts rather than entire blog posts.
3) Adapt the feed CSS and templating so this doesn't look absolutely terrible.
I started by updating the number of posts per page to 20, rather than 5. This is an easy setting to adjust in package.json, under config/posts_per_page. Since I don't intend to show images on the main feed, I don't think this should really affect load speed or user experience.
In partials/loop.hbs, I added a div to the bottom of each <article> element, following some advice I found here for retaining HTML in the event I want to show a code snippet or something similar:
    <div>
       {{#if custom_excerpt}}
        <div class="feed-excerpt">
            {{custom_excerpt}}
        </div>
        {{else}}
        <div class="feed-excerpt">
            {{content words="200"}}
        </div>
        {{/if}}
    </div>
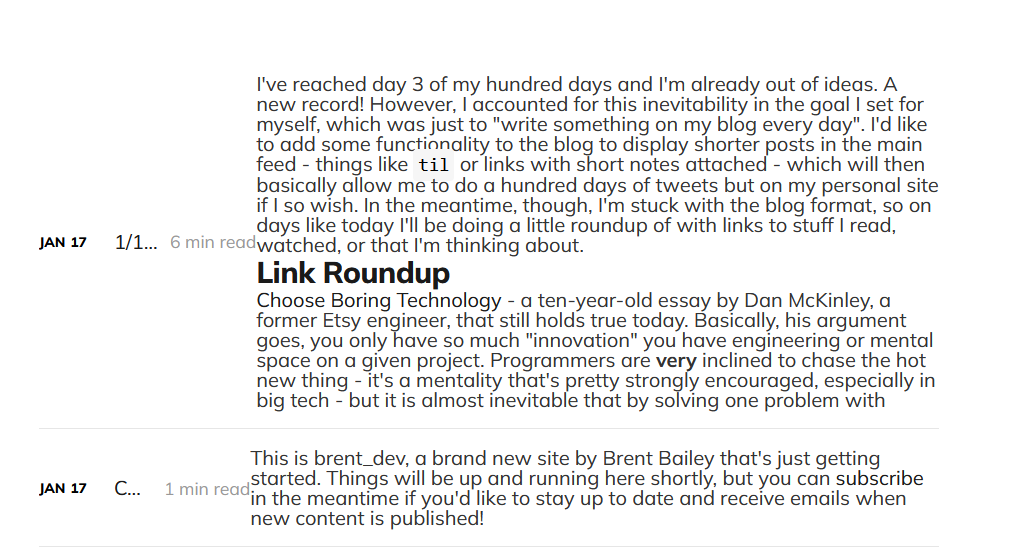
This worked, but looked like absolute ass:

So I added some custom CSS, largely just imitating the style of Simon Willison's blog:
.feed-excerpt {
    width: 80%;
    border-left: 2px solid gray;
    padding: 0 2rem;
    margin-top: 2rem;
    margin-left: 10%;
    &:not(.show-all-content) p:last-child::after {
        content: "...";
        color: purple;
        font-size: 2.4rem;
    }
    * {
        font-size: 1.4rem !important;
    }
    img {
        max-width: 50%;
        margin: 1rem auto;
    }
    code {
        padding: 0;
    }
    a {
        text-decoration: underline;
    }
    p {
        margin-top: 1rem;
    }

    h1, h2, h3, h4, h5, h6 {
        margin-top: 1rem;
    }

    figure {
        margin-bottom: 1rem;
    }

}

.post-link {
    margin-top: 1rem;
    margin-left: 10%;
    a {
        color: purple;
    }
}
And added a little link at the end of each post, its tags, and added some filtering to display my custom short-form things like #link and #note differently:
  <div class="w-100">
        <div class="feed-excerpt {{#has tag="note,link"}}show-all-content{{/has}}">
       {{#if custom_excerpt}}
            {{custom_excerpt}}
        {{else has tag="note,link"}}
            {{content}}
        {{else}}
            {{content words="200"}}
        {{/if}}
        </div>
        {{^has tag="note,link"}}
        <div class="post-link">
            <a href="{{url}}" class="feed-more">Read more
            <div class="feed-length">
                {{reading_time}}
            </div></a>
        </div>
        {{/has}}

    </div>

    <div class="tag tag-list">
        {{#foreach tags}}
            <a href="{{url}}" class="tag tag-list-item">{{name}}</a>
        {{/foreach}}
    </div>
And I get my desired features like so!

I'd like to add a fair bit more styling - this isn't exactly my dream blog layout - but I've finally got some features I've been thinking about adding for ages, and I didn't even have to learn a new tool to do it. I'll probably continue tweaking this, but I think the general thrust of this blog post should apply to anyone with a similar goal to me. You can find all my theme code here.